Signature Capture – Version 3.0
The Signature Capture program has undergone a major redesign that adds a number of new features. This user’s guide briefly outlines the improved functionality of the Signature Capture software.
Collecting Prescription Signatures:
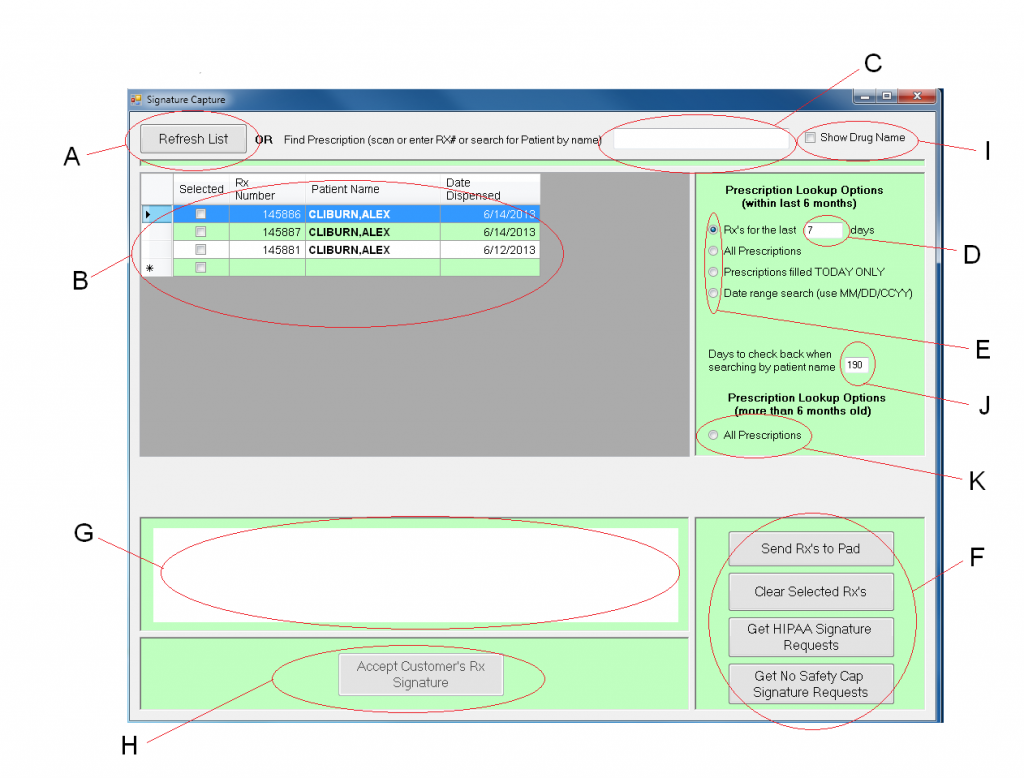
When launched, the Signature Capture greets you with a somewhat familiar, but functionally enhanced home screen. One of the first enhancements that you will notice is that prescriptions requiring a signature will automatically be displayed in the list shown in section B below. The software will now automatically update this list every minute as prescriptions are being filled. The list is also automatically updated and redisplayed after a signature has been collected. This eliminates the need to click a button that “Gets Prescriptions”. NOTE: The software will suspend the automatic updating of this list if your mouse pointer is within the area defined in section B. Once the mouse pointer leaves the area defined in section B, the automatic updating resumes.
A – This button will manually refresh the list of prescriptions that require a signature displayed in section B.
B – The list box shown in section B represents prescriptions that need to be signed for, based on the search criteria defined. To select a prescription to be signed, place a check mark in the checkbox next to the desired prescription by clicking the mouse in the checkbox. Checkboxes can be checked or unchecked as needed before the “Send RX’s to Pad” button is clicked
C – This field allows the user to enter a patient name, scan a patient name barcode, or enter a specific rx number. As you are typing, the system will populate the list shown in section B with all prescriptions that match the characters entered. When searching for prescriptions by patient name, the software will ignore all day or date range parameters and display ALL prescriptions that are due to be signed for the patient in question.
NOTE: When typing a patient name, you must enter Last Name,First Name.
D – This field displays the number of days worth of prescriptions will show in the list in section B. The software defaults to 7 days, however you can enter any number of days in this box. All auto-refreshing and invoked refreshing of the list in section B will use the value in this field.
NOTE: If you change this value, the software will hold that value until you either change it again or close the software.
E – Prescription lookup options. These options give the user increased flexibility when searching for prescriptions that require a signature. Any time an option is changed, the software automatically repopulates the list in section B according to the option selected.
- RX’s for the last __ Days: This option is turned on by default when the software starts. The software populates the list in section B prescriptions filled during the previous 7 days
- All Prescriptions: This option will display ALL prescriptions that need a signature
- Prescriptions filled Today Only: This option displays prescriptions filled TODAY that need a signature
- Date Range Search: This option allows the user to display prescriptions that were dispensed between the starting and ending date range defined by the user
F – Action buttons.
- Send RX’s to Pad: Click this button once you have selected all of the prescriptions that require a signature. The software will send information to the signature pad and wait for patient interaction.
- Clear Selected RX’s: This option can be used to clear the pad AFTER information has been sent to the signature pad in the event of a mistake. This option will also clear the checkbox for the prescriptions selected. This is basically your “start over” button
- Get HIPAA Signature Requests: Explained below
- Get No Safety Cap Signature Requests: Explained below
G – Signature window. This window will show the signature real time as the patient is signing. You now have visual verification that the patient has signed without looking at the pad.
H – This button will allow the employee to accept the signature on the pad.
I – This option allows the employee to view the drug name for each prescription. NOTE: Be aware that this option displays sensitive patient information and should only be used as needed.
J – The number of days that the system will search back for prescription that need a signature when looking for prescriptions by patient name
K – This option will display all prescription that still need a signature that are over 6 months old.
Collecting HIPAA Signatures:
HIPAA Signature collection remains a separate function from prescription signature collection. This separation is required because there is no “single patient” limit when signing for prescriptions. This flexibility means that we can’t automatically assign a signature collected while signing for prescriptions to an associated patient.
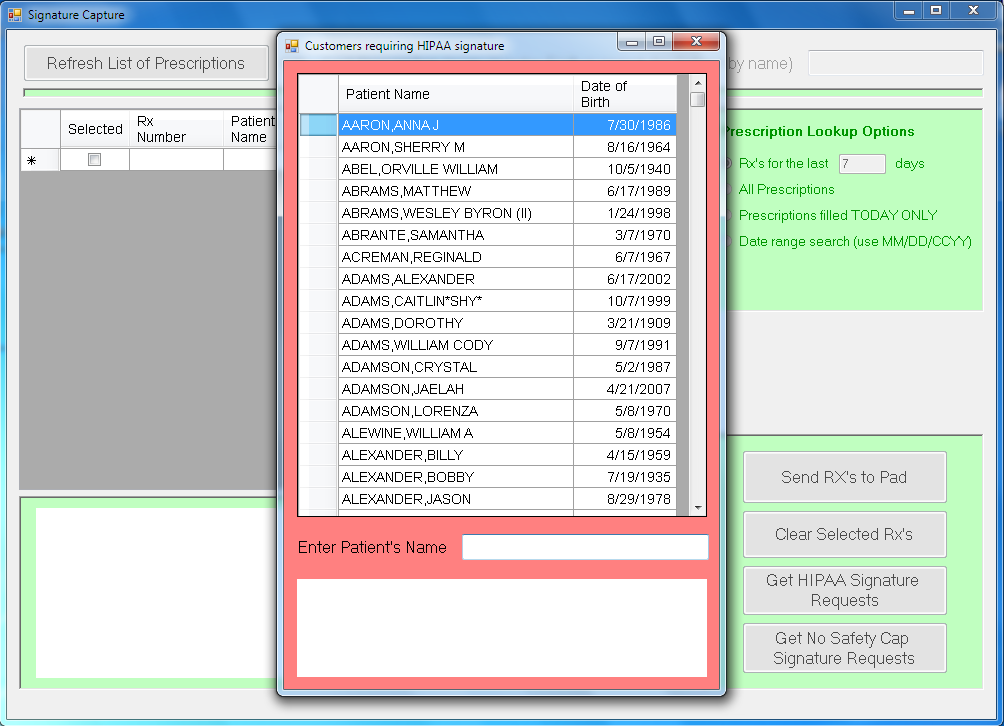
To collect a HIPAA signature, click the “Get HIPAA Signature Requests” button shown in section F above. Once clicked, you will see the screen shown below:
The cursor will be waiting for you input in the “Enter Patient’s Name” text box. As described above, the list will start refreshing as you are typing letters, drilling down until you find the desired patient. Clicking anywhere on the line that has the desired patient will send the signature request to the signature pad. The large white window directly under the “Enter Patient’s Name” text box will display the signature as the patient is signing. This screen will close when the patient touches “OK” on the pad.
Collecting No Safety Cap Signatures:
No Safety Cap Signature collection remains a separate function from prescription signature collection. This separation is required because there is no “single patient” limit when signing for prescriptions. This flexibility means that we can’t automatically assign a signature collected while signing for prescriptions to an associated patient.
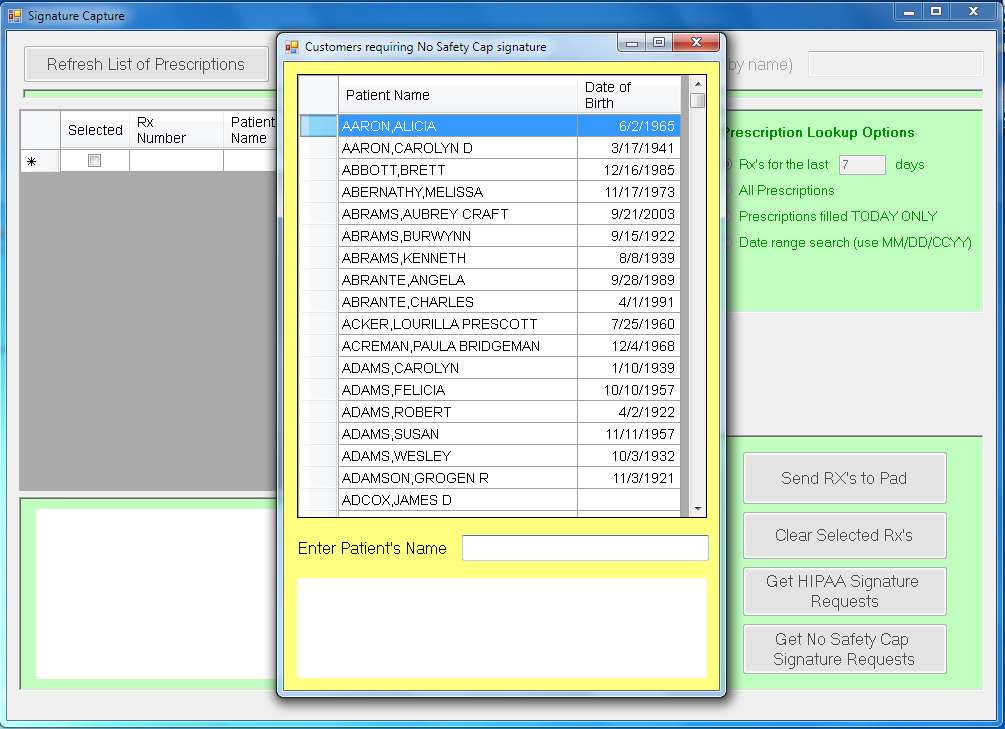
To collect a No Safety Cap signature, click the “Get No Safety Cap Signature Requests” button shown in section F above. Once clicked, you will see the screen shown below:
The cursor will be waiting for you input in the “Enter Patient’s Name” text box. As described above, the list will start refreshing as you are typing letters, drilling down until you find the desired patient. Clicking anywhere on the line that has the desired patient will send the signature request to the signature pad. The large white window directly under the “Enter Patient’s Name” text box will display the signature as the patient is signing. This screen will close when the patient touches “OK” on the pad.


